How I Use My 3D Printer to Make Custom Adaptive Tools
For the disabled community, 3D printing is far more than a nerdy hobby—it can give you tailor-made tools that transform daily tasks
When you shop through retailer links on our site, we may earn affiliate commissions. 100% of the fees we collect are used to support our nonprofit mission. Learn more.
I’ve always felt it was a waste of time to cry over things I can’t change. However, as I sat on my bedroom floor recently, struggling to twist open the glucose sensor my daughter needs to survive, crying seemed like a very reasonable response. I just couldn’t seem to find my way around this packaging. I closed my eyes and took a deep breath, when it occurred to me: “What if someone has found a way already?”
I was born with a rare birth defect called arthrogryposis. It affects people in different ways, but for me, it meant underdeveloped, stiff, and weak shoulders, arms, and hands. At age 2, I started using my feet to pick up crayons, and that moment set me up to carve a path through a world that was not designed for me.
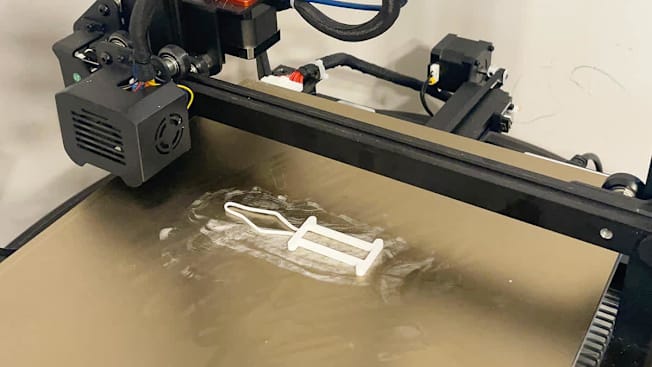
Photo: Sarah Kovac/Consumer Reports Photo: Sarah Kovac/Consumer Reports
I wore stretchy waistbands to avoid buttons, sat in taller chairs so my feet could reach my desktop, and just stayed thirsty when straws weren’t available.
With time, determination, and more support from the people around me than I might have acknowledged, I went on to get my driver’s license, graduate from college, get married, have three kids, publish a book, and launch my career as a journalist, all while using my feet instead of hands. I lived on my own during my college years, and I reveled in the independence. As I saw it, my lot in life was to create my own way, and that I did.
But struggling to open the glucose sensor with my feet that day, I felt like I was out of solutions. As my latest tech obsession has been my 3D printer, I turned to Thingiverse, an online collection of 3D printable files including any kind of object you can imagine, from doll furniture to car parts. I searched “Libre 3 sensor, arthritis.” (I don’t have arthritis, but many arthritis-friendly products fit my needs, and “arthrogryposis” isn’t the most effective search term, let me tell you.)
I didn’t even have to scroll to find that someone had designed a Libre sensor wrench set for their mother, whose arthritis caused her to struggle with the packaging, just like me. I saw a related design for the exact sensor we use. I printed the set the next morning, and I’ll probably never struggle to open a Libre 3 sensor again.
How Do 3D Printers Work?
The concept behind 3D printing is simple: The machine feeds a string of material (usually plastic) past a heating element, which melts it, and then squeezes it out through a small nozzle. Think of the mechanics of a glue gun. The nozzle moves around, laying down strings of melted filament on top of each other until you have a solid mass of plastic in the shape you designed.
Because the nozzle needs to be able to move to the farthest edges of the print surface and rise to the height of the very highest layers of a print, these machines can take up a couple of feet of space in all directions. The larger the items you want to print, the more space you can expect your printer to take up in the room.
Printing Adaptive Equipment
3D printing began grabbing headlines in the early 2010s as it became possible to print prostheses. The ability to quickly modify existing designs means that it’s easier than ever to get new prosthetic limbs for children as they grow. One of the biggest names in the 3D-prosthesis space is E-Nable.
E-Nable is a global network of volunteers who have provided free prosthetic hands and arms to an estimated 10,000 to 15,000 people. It started in 2012, when artist and designer Ivan Owen modeled a prosthetic hand inspired by a 19th-century design. When he realized how quickly children outgrow their prostheses, he learned to use 3D design software so that his designs could be easily modified and reproduced. 3D printer company MakerBot donated two printers to Ivan’s cause, and his hand design was made public for anyone to modify and print.
Printing an entire, functioning prosthetic limb is a pretty advanced project, but the declining prices of entry-level 3D printers are making smaller-scale adaptive innovation accessible in a way it has never been before. I own two 3D printers, and both cost under $300. Even after years of using this tech, it’s still amazing to watch my ideas materialize over the span of a few hours.
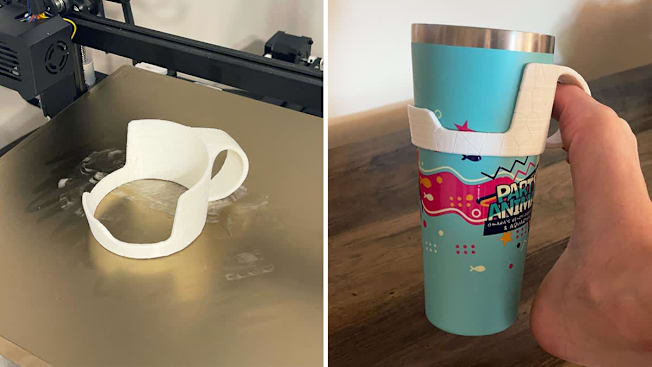
With the help of my printers (and the generous community surrounding them), I’m able to hold a Starbucks cup or soda can with ease. I have a tiny tool that helps me button jeans. I’m even experimenting with my own adaptive designs in Tinkercad, a basic CAD (computer-aided design) program. Having access to this technology has changed the way I view, well, everything.
Instead of living life as a walking accommodation to the world around me, I can build bridges between my abilities and the things I want or need to do. I can make the perfect tools for my unique experience of arthrogryposis. It’s mind-blowing, quite frankly, to be able to create the exact tools I need.
Anyone who has experienced the joys and frustrations of 3D printing can tell you that it is a tedious and sometimes aggravating endeavor. Many variables can affect the quality and success of a 3D print, such as temperature, airflow, materials, the software used, the printer type, humidity, and more. It’s not for the easily discouraged.
But for those of us who enjoy a technical challenge and don’t know when to quit, 3D printing adaptive products can be fun and incredibly rewarding.
Little tools that make daily life easier are where printing your own adaptive equipment really shines. You can print tools that will help you brush your teeth, button up a coat, sign a document, cook a meal, play with your kids, and more. The best part about printing your own adaptive items at home is that you can iterate and refine as much as you need to. You can tweak the design and print out multiple versions until you find what works.
I don’t think I’ve ever successfully printed out an adaptive tool that was exactly what I needed on the first try. I continue to tinker until I get it right. But for those who don’t have struggles as unique as mine, there will be no shortage of designs that are exactly what you need from the start.
Where to Find Printable Files of Adaptive Tools
If you’re accommodating a well-known disability or condition, there’s a good chance that the design you’re looking for already exists. For example, if you’re looking for wheelchair accessories, you can quickly find designs for a wheel guard, a combination cup holder and phone mount, a headphone hook—shoot, you can print an entire wheelchair. Even a wheelchair for a dog. Or a duck(?!).
If you can think it, someone has probably designed it. You just have to know where to look.
Popular Sources for 3D-Printable (.stl) Files
- Cults3D is a marketplace with both free and paid files. You’ll find some more niche designs here.
- Makers Making Change is an organization that pairs people with disabilities with volunteers who will print adaptive products for free. The site is home to some 200 adaptive product designs, which you can request to be printed for you or download and print yourself.
- Printables is another great collection of designs, many of the same ones you’ll find on Thingiverse, within a friendly interface.
- Thangs is an awesome marketplace known for tweaks and variations of popular designs.
- Thingiverse is one of the oldest and largest 3D file repositories. It’s been around since 2008.
- Yeggi is basically a search engine for 3D files that pulls from multiple repositories and communities.
Printing at Home
For those up to the challenge, printing assistive devices from home is a great option. You’ll need to start with a user-friendly 3D printer. I’m using the term “user-friendly” pretty loosely, as there are a lot of elements to think through for first-timers.
Here are a few things to consider before you buy a 3D printer.
Print volume: Think about the dimensions of products you want to print. If you envision printing items larger than 5 to 6 inches in height or width, you might want to opt for a larger 3D printer.
Setup: You’ll want to set up a dedicated spot for your printer, as these fairly delicate machines can get knocked off-kilter easily. Identify a low-traffic area where the printer isn’t likely to be bumped. Avoid drafty locations, as airflow can cause the filament to harden too quickly.
Materials: Most printers will come with a couple of samples of filament (the plastic that feeds through the machine to create the item that you’re printing). However, the included filament will usually only be enough to make one or two very small items. You’ll very quickly need more. PLA (polylactic acid) is generally regarded as a versatile, beginner-friendly filament, so it’s a great place to start. I myself am partial to Overture PLA filament. It’s about $15 for a 1-kilogram spool; a spool of this size is enough to print multiple small items or a couple of larger ones.
Learning curve: Once you have your printer set up and you’ve bought your filament, settle in for a steep learning curve. Even with basic 3D printers, there is a lot of calibration and software setup to be done in order to print an item successfully. Give yourself time to get the process down. Find groups on social media and YouTube channels dedicated to the art and science of 3D printing. Take your time—there’s a lot to learn.
If you think this will be too overwhelming, check your local library to see if it has a 3D printing program. This is probably the cheapest way to enter the 3D printing space, but your ability to iterate on designs and print multiple copies may be pretty restricted (my local library allows for one 3D printed item per month per patron).
Using a Print Service
Adaptive tools and equipment are notoriously expensive, so the price of a 3D printer was well worth it for me. But if you don’t want the cost and hassle of having your own 3D printer, there are plenty of services that will print for a fee. Some of the more well-known services are Craftcloud, Makelab, Print a Thing, Sculpteo, and Xometry.
Many print services are geared toward businesses with high-volume 3D printing requirements as opposed to the needs of an individual. So pricing can be a little steep. But if you don’t foresee needing lots of products printed, a print service may be worth it. It guarantees a quality print and saves you the hassle of buying a printer and learning the software. You can also check Fiverr.com, the online marketplace of digital freelancers, to find people who can provide one-off prints for a more reasonable fee.
To give you an idea of cost, I got quotes from a few different 3D print services for a small can- and bottle-opening tool. The lowest was $15.30, from Print a Thing.
Printing it at home is likely to be much cheaper, but you do, of course, have to get past the initial investment of at least a couple hundred dollars on the printer itself and then perhaps $20 on a spool of filament.

Source: Print A Thing Source: Print A Thing
The Bigger Picture
In the world of accessibility, the power dynamic is shifting. Just about anyone can learn and build simple 3D structures with the free design tool Tinkercad, for example. Most of us can have our designs printed at our local libraries—also free.
We don’t need a prescription. We don’t need a referral. We don’t need permission, and often we don’t even need help, either printing designs at home or sending a file off to a print service. Gone are the days of one-size-fits-all solutions being handed to us by people who, though well-intentioned, don’t really understand what life is like for us.
Technology is giving us the power to include ourselves more deeply in the broader culture instead of waiting to be invited.

