Best Food Dehydrators
Our luxury pick costs $400, but our smart buy costs just $65 and won’t take up your entire counter
When you shop through retailer links on our site, we may earn affiliate commissions. 100% of the fees we collect are used to support our nonprofit mission. Learn more.
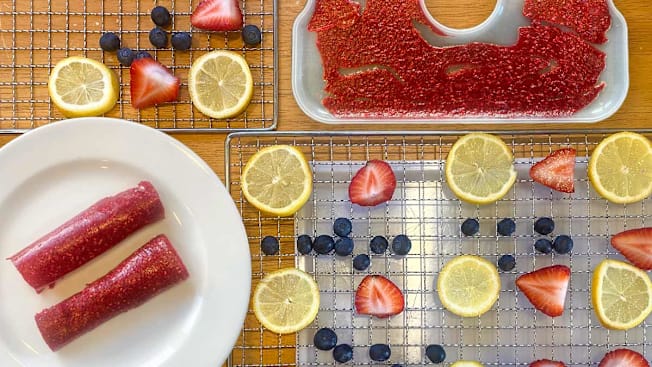
Food dehydrators are an investment up front, but if you want to save money on grocery bills (and who doesn’t?), you may find they are well worth it. Whether you want to reduce food waste, make healthy homemade snacks and dried herbs, or extend the lifespan of foods, a food dehydrator is a valuable tool that can make you feel like a frugal culinary genius.


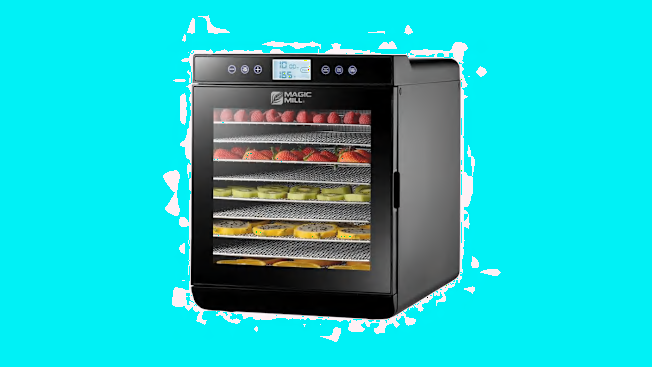
Overview: The Magic Mill food dehydrator is our top choice because it gives you a lot of bang for your buck, its setup is intuitive, and it works well on a variety of foods. It comes in a few sizes and prices that range from one with five trays for $59.99 to an 11-tray option for $399.99. We tested the 10-tray dehydrator, which includes 10 stainless steel trays, one mesh tray for small herbs and fruits, one fruit leather tray, and one hanging rack if you want to dry several larger pieces of meat. Cute green silicone mitts can be used to handle hot trays. A colorful cookbook offers tips on temperature settings and cooking times for various fruits, vegetables, yogurt, fruit leather, jerky, and cheesy kale chips. Though not as extensive as the Excalibur’s cookbook, it was a helpful guide for a beginner like me.
This dehydrator has a window on the front door that allows you to peer inside and see your food’s progress. However, it isn’t as large as Excalibur’s window (see below), which extends to the top of the dehydrator, giving you a bird’s-eye view. It is also not lit up on the inside like Excalibur’s, so it’s difficult to check the progress of food positioned toward the back of the unit.
Ease of setup: So easy. Click on the digital timer and temperature (the same button), then use the plus and minus buttons to adjust the time and temperature. Click a start/stop button. There are also keep warm and fast/raw buttons that I didn’t test. The temperature and time are displayed simultaneously in a light-up window on top of the door, which is a better feature than Excalibur’s window (in which the time and temperature do not appear simultaneously). The timer is also great because, like the Excalibur (and unlike Hamilton Beach), it counts down with precise times—2:44, 1:55, etc.—so that you’ll know exactly how much time your food has left to dry.
Noise: This was the least noisy of the three dehydrators. It sounded like a quiet microwave humming while warming up leftovers.
Space and storage: My kitchen counter measures 25.5 inches in depth, and this dehydrator took up 18 inches of that space, which isn’t an insignificant amount. Although not as deep as the Excalibur, I can’t imagine this big unit will sit on most people’s counters indefinitely. Make sure you have enough storage space in your basement, garage, or attic when you don’t plan on using it.
Drying Herbs
The manual said to set the temperature to 95° F when dehydrating herbs, but it didn’t provide dehydration times for parsley or basil. It provided a time for garlic—six to 16 hours—and instructions to remove the skin from the clove and slice the garlic before placing it on a tray. I found that time recommendation nebulous, so I set it for 6 hours and figured I would check on the herbs and give the garlic additional time as needed.
I checked my herbs at 6 hours, and they weren’t ready, so I left them in for another hour and a half. One tray of garlic yielded a nice amount of dried garlic (though I would have had to dehydrate it for longer to create powder), two trays of basil yielded an even more abundant amount of dried basil, but two trays of parsley, sadly, produced a paltry amount of dried parsley. I don’t think this is the machine’s fault, but the reality of dehydrating a small herb (pro tip: Keep parsley and similar herbs on their stems, or they will fall through the mesh screen or trays. It’s easier to break them off the stems after they are dry to crumble them into powder—I did this by hand).
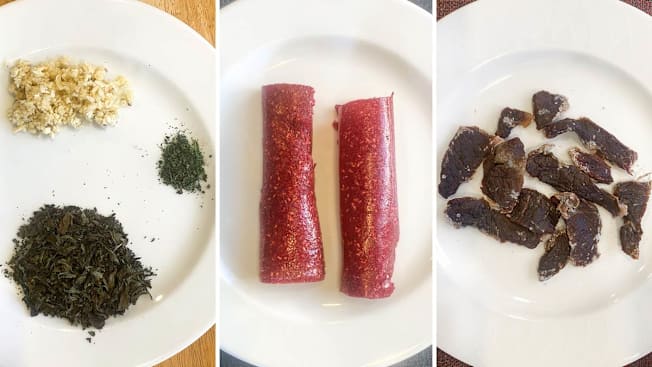
Photos: Lisa Fogarty/Consumer Reports Photos: Lisa Fogarty/Consumer Reports
Fruit Leather
I found fruit leather challenging, regardless of which dehydrator I used. I’ve concluded that each attempt brings you closer to fruit leather greatness, but this recipe has a learning curve. I was relieved to discover that the Magic Mill cookbook contained more specific dehydration instructions for fruit leather than the Hamilton Beach dehydrator (below). The Excalibur did not come with the solid sheet necessary to make fruit leather, so I can only compare my results using the Magic Mill with those from the Hamilton Beach dehydrator.
Apply cooking spray to the fruit roll-up sheet to help remove the fruit leather once it has finished dehydrating, but don’t overdo it—if you add too much cooking spray, it can seep into your puréed fruit and make it oily (I learned this from experience). Pour your purée directly onto the lightly sprayed sheet. My first attempt dehydrating apricot purée at 155° F for 6.5 hours came out well. I wouldn’t say it was identical to store-bought fruit leather and you should expect the color to be muddier than what you see in the stores (remember: You aren’t relying on a company’s decades-old recipe or fruit supply; you’re making these with nothing more than fruit, sugar, water, and a prayer. Plus, many fruits will oxidize during the drying process and can change color). But it tasted sweet and had a soft and chewy consistency. It didn’t yield much, but you can purchase additional fruit leather trays to make more during the same session.
My second attempt with blueberry purée was a disaster—the blueberry purée started to separate almost immediately. Since the same thing happened with blueberry purée in the Hamilton Beach dehydrator, I’m blaming the blueberries and my lack of experience. While leafing through my Excalibur dehydrator manual I learned that juicy fresh fruits (strawberries are given as an example) can be too runny to create a thick, chewy leather and that adding a banana when puréeing can help. Magic Mill also suggests adding puréed apple or pear as a thickening agent. Could my blueberry purée have been saved by another fruit? Live and learn.
My third attempt was raspberries. I checked the fruit leather after 6 hours and decided that was enough time to reach the right consistency. My advice for first-timers is to be patient and check your fruit leather after about 6 hours because, depending on the thickness of your purée, this temperamental food can be overcooked quickly, resulting in dry, brittle fruit leather that is more difficult to remove from the tray. Try to make the edges of your fruit purée thicker than the center (easier said than done, but the edges cook faster, so this is good advice. I carefully poured more purée around the edges, but if I could do it over again, would have used an offset spatula to help).
Beef Jerky
Cut your meat thin. Magic Mill says each slice should be of equal thickness of about 5 millimeters and recommends partially freezing the meat first, which makes slicing easier. Salt the meat generously, as well. If you don’t do these things, you will be asking for a lengthy dehydration session. Magic Mill’s cookbook provides a basic beef jerky recipe (it suggests using beef fillet or sirloin with excess fat trimmed) and one for fish jerky. It then instructs you to dry the beef at 155° F for 5 hours, rotating racks halfway through drying.
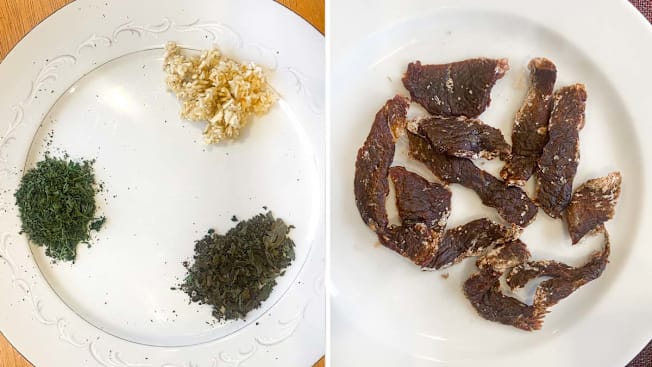
The white parts on the beef jerky are salt and fat, which doesn’t look too appealing. Learn from my mistake and choose a lean cut of beef or do a better job trimming excess fat. The jerky was crispy and well done at 5.5 hours when I removed it because of an unexpected errand I had to run. Stick to Magic Mill’s 5-hour recommendation, as it felt a little too dry in spots.
Cleaning: Before using this dehydrator, you are supposed to wipe all parts of the appliance, including trays and accessories, with a lightly moistened cloth. You can use detergent as needed but should not put the main engine into water or other liquids. Run the unit empty for 30 minutes before using it. After dehydrating each food, I removed excess marinade inside the unit with a paper towel, as the instructions recommend, and wiped down the unit’s bottom, sides, and front door with a wet cloth. Cleaning the dehydrator was simple and I didn’t need soap.
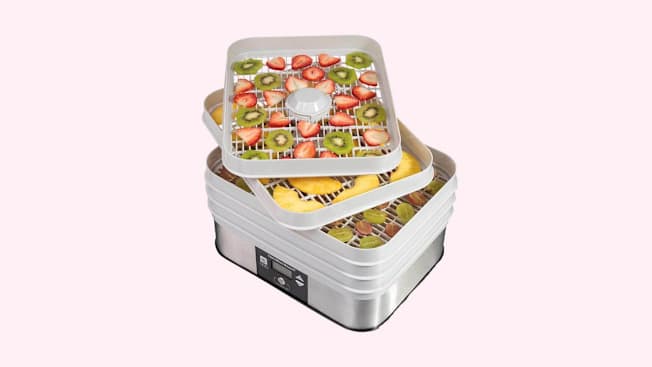
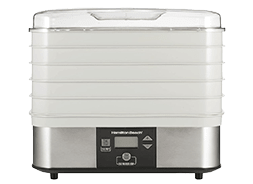
Overview: The Hamilton Beach Digital Food Dehydrator is a vertical unit with five stacked trays. Its temperature range isn’t as extensive as the Magic Mill or Excalibur, and it doesn’t feel as substantial—its trays are made from plastic instead of steel, for example, and it has a Brutalist design that lacks windows and the ability to see your food cooking, except for the food on the top tray. To check your food’s progress, pause the dehydrator, unstack each tray, and take a peek. But it’s a space-saving unit and the smallest on our list. It also handled most dehydration tasks commendably—a standout task was how well it dried herbs.
Its black-and-white instruction booklet includes food safety tips (see below for tips on safely dehydrating meat), dehydrating temperature and time charts for fruits, herbs, and vegetables, and three beef jerky recipes.
Ease of setup: The Hamilton Beach features basic manual settings that are easy to figure out. Click one button for time/temperature and set both using the up and down arrow buttons. The start button also serves as a pause button. A tiny screen in the front of the unit alternates between providing the temperature and time you have left, but the time isn’t precise the way it is on the Magic Mill and Excalibur dehydrators. For example, a “2” will appear on the screen to let you know that the food will finish drying somewhere within 2 to 3 hours, but because the time isn’t precise, you won’t know if that means 2 hours and 55 minutes or 2 hours and 5 minutes.
Noise: This was the noisiest dehydrator we tested. It sounded like a loud microwave buzzing along.
Space and storage: Of the three dehydrators, this was the only one I could imagine someone keeping on their kitchen counter at all times. If you were to store it, it would take up much less space than the others.
Photos: Lisa Fogarty/Consumer Reports Photos: Lisa Fogarty/Consumer Reports
Drying Herbs
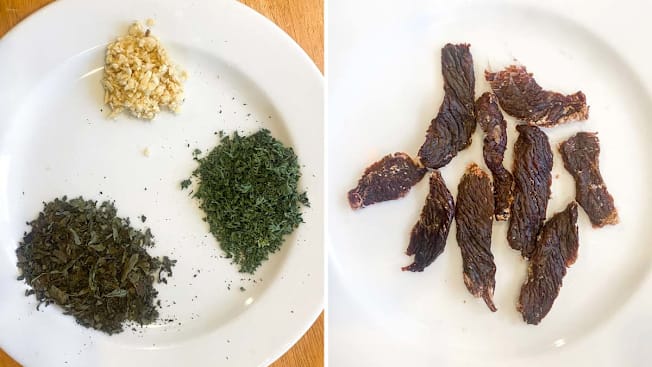
Hamilton Beach did the best job drying parsley, basil, and garlic out of all our dehydration tasks. Its instructions say to set the unit to 100° F, and for parsley and basil, expect it to take between 4 and 6 hours. I set it for 5 hours and figured the garlic might need more time. The holes in the trays are on the broader side, so if you try and cut the stems off parsley or slice thin pieces of garlic, they will fall through the holes—alternatively, you can use the included fine-mesh sheet for small herbs and vegetables.
I dried one garlic tray, two parsley trays, and two basil trays. I was pleasantly surprised at how well the unit dried most of my herbs evenly after 6 hours and how few emerged still soft. The garlic could have used more time.
Fruit Leather
According to the Hamilton Beach manual, lightly spray the fruit roll sheet with nonstick cooking spray or vegetable oil before adding puréed fruit. Add about a cup of purée to the sheet; from there, no additional guidance is offered about temperature and time. I relied on the National Center for Home Food Preservation’s recommendation of 140° F for fruit leather. I set it for 6 hours because that’s what the Magic Mill recommended and checked for doneness after 4 hours, as recommended by the Hamilton Beach manual. I crossed my fingers and hoped for the best.
First, I tried blueberry purée and, as with the Magic Mill, found it started to separate as it dehydrated. Straight to the trash with that one. My second attempt was apricot purée, but after checking it at 4 hours and realizing it was still wet, I left it in for 7 hours and it came out hard as a rock.
My third and final attempt was the closest to success: raspberry purée, which was the right consistency after 6 hours but tough to remove from the fruit roll sheet:
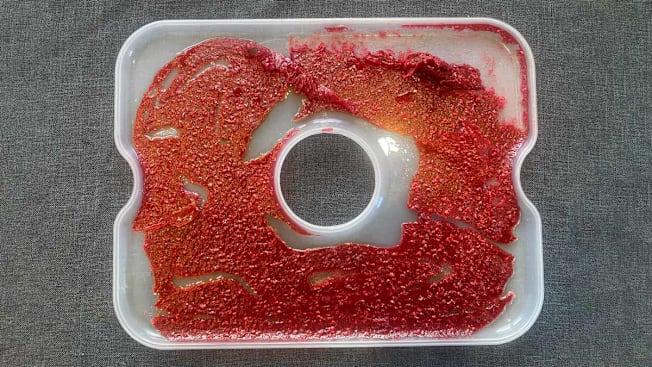
Photo: Lisa Fogarty/Consumer Reports Photo: Lisa Fogarty/Consumer Reports
I don’t think the hole in the middle of the fruit roll sheet lends itself to easy purée application or peeling. I would also encourage you to add more purée to the edges because they cook quickly and dry out faster. Start checking your fruit leather at around 4 hours because overcooking it even slightly requires a laborious removal process. The Magic Mill fruit leather came out better, but I don’t think all hope is lost with the Hamilton Beach if you’re willing to be patient until you get it right. As with the Magic Mill, Hamilton Beach only yields one piece of fruit leather from one dehydration session, but you can order additional fruit roll sheets to make larger batches.
Beef Jerky
The instructions recommend setting this dehydrator to 160° F for 4 to 8 hours, so I settled on 6 hours to start.
I was impressed with how this beef jerky was crispy on the outside and tender on the inside. All the pieces appeared equally well cooked, despite the fact that one major complaint you’ll sometimes hear about vertical dehydrators is that they don’t cook as evenly as horizontal dehydrators.
Cleaning: These trays got messy. You can wash them in warm, soapy water or the dishwasher (the manual doesn’t specify whether to place the trays on the top rack, but it does recommend not using the “SANI” setting on your dishwasher). The base can be wiped down with a damp, soapy cloth.
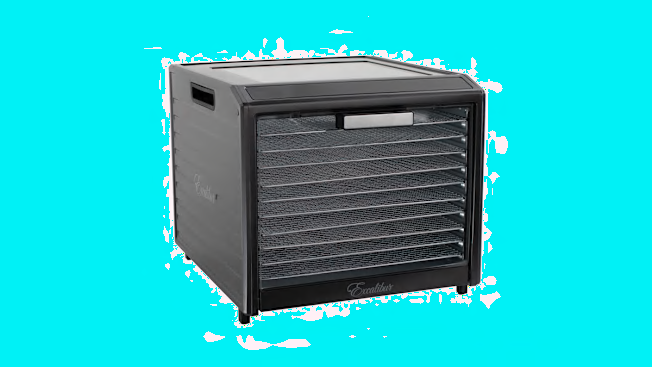
Overview: The Excalibur is a pricey dehydrator—you’ll have to decide if its additional perks are worth the money. It features the most extensive temperature range of the three dehydrators we tested, and it can run for as long as 60 consecutive hours—12 hours longer than the others. It has an elegant design with a drop-down door instead of one that opens from left to right. Its standout features are large windows on both the door and top of the unit and a lighted interior, so you can see everything you’re cooking at once.
However, I was disappointed that it lacked key features that the others had, namely, a fruit leather sheet (which you’ll have to purchase separately). Of all the dehydrators, this one comes with the most comprehensive instruction manual, a drying guide for various foods, and a colorful cookbook. It has many helpful tips, including which in-season fruits and vegetables to purchase and recipes for jerky, herbs and spices, fruit leather, pasta, yogurt, and pet treats.
Ease of setup: The Excalibur is as simple as the others to set up, but the Magic Mill’s manual settings are slightly more intuitive. Tap the digital power button and then tap either the temperature or timer button (which are separate) and use the individual up and down arrow buttons to set a time and temperature. When you’re ready to begin dehydration, press the start button, which doubles as a pause button. The temperature appears in a light-up window above the top of the door and transitions to a count-down clock every few seconds (the Magic Mill’s window simultaneously shows the time and temperature). Its countdown clock gives an exact amount of time you have left.
Noise: Its noise level is equivalent to a microwave constantly on and humming as it cooks food. I found it to be louder than Magic Mill, but not by much (and it’s far quieter than Hamilton Beach).
Space and storage: The Excalibur is shorter in height and slimmer in width than the Magic Mill, but it takes up more depth on your counter. Unless you have tons of counter space to spare, you’ll need enough storage space elsewhere to make it worthwhile.
Drying Herbs
Excalibur’s manual suggests washing plant leaves the night before (if you dehydrate them while they are still wet, they may turn brown when dried, according to Excalibur). Space the leaves on trays and dehydrate them at no more than 95° F until the leaves are crisp enough to crumble in your hand (the recommendation is 2 to 4 hours, but some herbs may take longer). I removed the herbs after 4 hours.
I dehydrated one garlic tray, two parsley trays, and two basil trays. As with the others, the garlic became dry but would need more time in the dehydrator before grinding it into a powder using a food processor.
Photos: Lisa Fogarty/Consumer Reports Photos: Lisa Fogarty/Consumer Reports
Fruit Leather
Despite being the priciest dehydrator on our list, the Excalibur didn’t come with a tray for making fruit leather. Its manual recommends purchasing the Excalibur ParaFlexx Ultra Silicone Non-Stick Drying Sheet for $15.99. As a result, I couldn’t test how Excalibur makes fruit leather.
Beef Jerky
Excalibur recommends drying beef at 155° F for 4 to 6 hours. I settled on 6 hours and checked it starting at 4 hours to ensure it wasn’t drying out too quickly.
Similarly to the Magic Mill, I could have gotten away with drying the beef for 1 hour or 1/2 hour less because some spots on the meat were dryer than others. But, overall, this unit churned out dry, chewy beef jerky. Some of the pieces snapped apart a little too easily, which was proof that they were overcooked; others were chewy perfection.
Cleaning: Before using the Excalibur, the manufacturer recommends wiping all the parts of the appliance and not using harsh chemicals or abrasive materials for cleaning. Clean the interior with a cloth or sponge, warm water, and mild detergent. The trays and poly screen should be hand-washed with warm, soapy water and then rinsed and air-dried. Dishwashing is not recommended.
Tips to Get the Best Outcome
If you’ve never used a food dehydrator before, it can be an intimidating appliance to master. As I’ve shared, I made plenty of first-timer mistakes when dehydrating fruit leather, beef jerky, and herbs, so I’m eager to provide dehydration tips that can help you get the best outcome.
Fruit leather: You can use fresh or canned fruit to make fruit rolls, but never mix the two. If you’re using fresh fruit, peel and cook it before puréeing it in a blender. The edges of your fruit leather should be thicker than the center (if not, they’ll dry out too quickly and become brittle). If you are using fresh fruits that are runny after you’ve puréed them, you can add a banana, puréed apple, or pear to thicken the purée. Pour ¾ to 1 cup of purée on each tray (after spraying it lightly with cooking spray) and allow it to spread out. Once the fruit leather is ready to peel off the tray, you can roll them to form logs and wrap them in parchment paper. Store them in an airtight container in a cool, dark place for up to one week (don’t store them in the fridge; you need a moisture-free storage space).
Beef jerky: Choose high-quality, lean-cut meat without much marbling (such as beef fillet or sirloin) and marinate it prior to slicing it (make sure to add plenty of salt). When you are ready to slice the meat, it can be helpful to partially freeze it first, which makes slicing easier. Always slice the meat across the grain and make the slices thin, preferably 5mm (Magic Mill says you can achieve this with a deli-style meat slicer—a sharp chef’s knife will also work). Dehydrated meat should be stored in an airtight container in the fridge for one to two months. If you want to store it for longer, label, date, and freeze it for up to three months. Never store it at room temperature, which can promote bacteria growth if not dried thoroughly.
Herbs: Always rinse herbs with cold water the night before you plan to dehydrate them (if the leaves are still wet, they can turn brown when dried). Herbs with large leaves like basil, bay leaves, and mint should be picked from the stems before drying; herbs with smaller leaves like parsley, cilantro, and dill should be kept on the stems when drying (it’s easier to remove them this way). Space leaves on the tray so that they aren’t touching. Dehydration temperatures for herbs should be kept below 100° F to prevent flavor loss. Herbs should crumble easily when dried and must be cooled completely before storing them in an airtight container. When stored in a cool, dark, dry location, dried herbs should retain their flavor for six months to one year.
Room temperature and humidity matter: Try to keep the air temperature in your kitchen stable while you are dehydrating foods. If the temperature is too low or the humidity in your space is too high, the food will dry more slowly and could become more prone to microbial growth.
Can You Use an Oven Instead of a Food Dehydrator?
Do you even need to spend money on a separate food dehydrator when you have a perfectly good oven? Your oven can dehydrate foods like fruit, beef, and herbs, but because ovens lack built-in fans for air movement, it can take 2 to 3 hours longer to dry foods in the oven than in a dehydrator. If you choose to use an oven, it is recommended that you first ensure your oven’s temperature goes as low as 140° F. An oven thermometer should be placed near the food to read the drying temperature accurately. It is also recommended that you leave the oven door open 2 to 4 inches and place a fan near the outside of the oven door for air circulation.
You should never leave your home if your oven is on. The additional time oven dehydration takes, coupled with the added accessories and steps you’ll need to take to ensure adequate dehydration, makes it more challenging to use an oven instead of a food dehydrator.
Can You Dry Foods Under the Sun or in a Microwave?
Drying foods in the sun is a fickle process. It can take three to four days for foods to dry this way, and if humidity is high, foods can mold before they dry. Although you can dry small quantities of herbs and some leaf vegetables in a microwave, it often tastes overcooked and isn’t as successful for drying other foods.
Is it Safe to Dehydrate Beef?
Cooking meat to safe internal temperatures is essential to kill harmful bacteria and prevent foodborne illness. The potential issue when dehydrating beef jerky is that some dehydrators, like the Magic Mill and Excalibur, recommend a temperature of 155° F (Hamilton Beach recommends 160° F), and the safe internal temperature recommendation for beef is 160° F. The Excalibur manual states, "Meat will hit 160° if you use the 155° set point on the dial.” The Hamilton Beach manual recommends taking more precautions by either baking your meat in an oven set to 350° F for five to 10 minutes (until internal temperature reaches 160° F) before dehydrating it or post-treating the meat after dehydration by placing it in the oven for 10 to 12 minutes at 275° F.
According to James E. Rogers, PhD, CR’s director and head of product safety testing, determining how long it takes the meat to reach an internal temperature of 160° F depends on the cut of the meat (thickness, size, etc). “When I cook, I have to take multiple readings in the thickest part of the cut to make sure it gets to 160° F,” Rogers says.
Grab yourself a meat thermometer and have it handy if you plan on making beef jerky in your dehydrator.
How We Tested Food Dehydrators
Over several days, we tested the three food dehydrators’ ability to dry several foods: blueberry, apricot, and raspberry purée for fruit leather (we could not test the Excalibur because it didn’t come with a fruit roll-up tray); Italian parsley, basil, and garlic for dried herbs; and beef for beef jerky. We followed each dehydrator’s specific instructions (when included) about recommended temperatures and times to dry different foods; observed how noisy they were and how easy they were to set up, use, and clean; and took notes on the amount of counter space and storage space needed for each unit.


