How to Secure Your House When Severe Weather Forces You Out
When you need to evacuate, taking these steps will help protect your home


When a major storm is bearing down, you often have little time to prepare. If you’re ahead of the game, you’ll have a go bag ready, and plans in place to shelter your pets and keep in touch with scattered family members.
But you’ll also want to do what you can to secure your property so that your home will be as damage-free as possible when you return.
Below, we’ve listed actions you can take, organized roughly by how much time you have before leaving your home. We’ve listed the more time-sensitive steps first, followed by actions you can take if you have a few days’ warning. Try to complete as many of these tasks as time allows before evacuating, but with the understanding that your safety, and that of your family, takes priority over protection of any property.
Clear the Yard, Ready Water Supplies
Move patio furniture, grills, bikes, plant pots, and other outdoor items inside the house or garage. Elevate items (like a gas grill or lawnmower) that won’t mix well with water.
Getting loose objects away from your house is key; high winds can turn even small items into powerful projectiles. Make sure, too, that storm drains are not blocked by debris, because any water buildup can cause your yard, and subsequently your house, to flood.
Garage vehicles you won’t be driving, or move them to a safer location. Read CR’s advice on protecting yourself and your car in a hurricane or heavy storm.
At the same time you’re moving items, fill your bathtub and take other actions to ensure that you’ll have water when you return—just in case there’s a problem with your supply.
Elevate Items That Rust or Corrode
If flooding is predicted, unplug all your appliances, moving portable appliances and electronics to higher ground. Televisions, speakers, vacuum cleaners, even generators—these need to be several feet off the ground, such as on a countertop or dining room table, or on the second level of your home if it has one, in case your ground floor or basement floods.
But remember: “When moving heavier items, such as a generator, be sure you will be able to move it into position on your own or with the help of someone else when you return,” says John Galeotafiore, associate director of product testing at Consumer Reports. And if you do need to use a portable generator after the storm has passed, here’s how to safely and quickly set it up and use it.
Protect Windows and Doors From Wind
High winds can easily crack a window or door that’s not impact-resistant. Strong winds can then fill a home like a balloon, threatening the integrity of the roof—and the entire home.
Protect Against Water Incursion
Most water enters a home from wind-borne rain, experts say. Before a predicted hurricane, securing inexpensive plastic sheeting around the base of your home, as well as doors and windows—even those that have been boarded up or shuttered—can reduce that inundation.
In its hurricane guide, the City of Orlando, Fla., recommends placing thick plastic sheets (4 to 6 mm) over windows and doors, and securing it with duct tape. Louisiana State University provides in-depth directions for creating a robust plastic water shield; keep in mind that the process will take longer than simply covering windows.
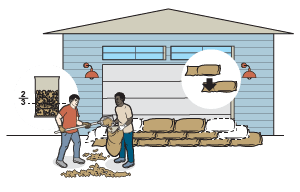
If rising floodwaters are predicted, protect your home with commercially made sandbags, untreated burlap sacks filled with sand, or light, “sandless” flood barriers that expand when wet to work like sandbags. To fill and stack sandbags, make sure you have a crew of at least two people; filled sandbags can weigh 30 to 50 pounds. Wear work gloves. Lift with your legs and bend at the knees to protect your back. Check out Lowe’s guide to filling and placing sandbags, as well as storing used bags afterward.
Read more CR advice on protecting your home against flooding.
How to
Reinforce Your Garage Door
More than 90 percent of home damage from hurricanes starts because a garage door fails, according to the Federal Alliance for Safe Homes (FLASH), a nonprofit business and academic consortium based in Tallahassee, Fla. Once high winds enter your garage, the pressure can blow out other doors and windows—and more.
“There’s a strong likelihood the roof will be blown off too,” says Anne Cope, chief engineer at the IBHS.
We’ve seen videos in which individuals use lumber—vertical 4x4s, or both vertical and horizontal 2x4s—to anchor a garage door to the floor and ceiling of the garage. Ian Giammanco, lead research meteorologist at the IBHS, says his organization doesn’t recommend these DIY solutions because their efficacy hasn’t been tested. “Using lumber as bracing is too much of a question mark,” he said.
FLASH recommends small, inexpensive upgrades to your garage-door setup to prevent its failure. Check mounting brackets and connectors to ensure that the screws are tight and the track isn’t loose. If your door has only three or four mounting brackets on each side, add more. Replace rusted pins and old rollers, and check to make sure they’re balanced.
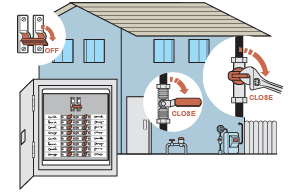
Turn Off the Power and Water Lines
Once you feel you’ve done all you can do to secure your house and you’re making your way to the car, FEMA recommends shutting off your electricity and main water valve if you can do so safely before you leave.
To turn off power, find your circuit breaker panel (typically located in your garage or basement) and set the main circuit switch to off.
To cut off the main water valve, walk around the perimeter of your house. Usually you’ll see a water meter mounted on the side of the house, then the water main valve below it, connected by a pipe. You may need to use a wrench to successfully turn the valve clockwise to shut off the water supply to your house. The shutoff may also be located inside a basement or attached garage.
How to
If You Have a Few Days
Buy a Weather Radio
These devices, starting around $30, provide severe-weather alerts from the National Oceanic and Atmospheric Administration. But they do much more than that, broadcastings warnings and post-event information for all natural disasters, as well as other emergencies like chemical releases, oil spills, and Amber Alerts for missing children. Shop for a weather radio with the NOAA All Hazards logo. These models meet voluntary industry standards, have undergone NOAA usability and performance testing, come with a backup battery, and have either a tone-alert feature—which keeps the radio silent until there’s a weather alert—or Specific Area Message Encoding, which lets you limit alerts to particular regions. Read more on keeping connected during an emergency.
Take Stock of What’s in the House
A majority of Americans—53 percent—haven’t taken stock of the items in their homes, says a recent survey by the insurer Munich Re and the Insurance Information Institute, an industry group. To make sure you get what you’re entitled to if you have to file a claim, do that home inventory. It should take a few hours. Walk around the house with a smartphone and take sweeping videos of the rooms. Film inside closets and cabinets, and open drawers. Describe the major items and—if you remember—what you paid. (Photograph receipts if you have them.) Capture serial numbers and brand names when possible. Don’t worry too much about cataloguing small stuff; an insurance adjuster is likely to create a “bulk estimate” of those things—for example, $200 for everything in your utility closet, insurers told us. (And if you’d like to consider changing insurers—after the storm, not before—find out which carriers Consumer Reports ranked tops; CR members have access to the full, survey-based ratings of 24 companies.)
Buy a Garage-Door Brace
This is a vertical support that attaches your garage door to the garage roof and floor. A brace kit for each door isn’t cheap—about $300—and availability may dip before a storm. But this solution is less costly than a new, storm-resistant garage door, which averages $6,000, according to the home-services marketplace Angi. Make sure the brace carries a wind- or impact-resistance compliance sticker, indicating that it meets the same standards that fortified garage doors must meet to protect against high-velocity winds. Giammanco of the IBHS says these manufactured braces have another benefit over ad-hoc lumber braces. “Commercial systems that meet known testing standards minimize the potential that you damage your own door inadvertently,” he says.


