Best Patio Coolers
A standing cooler for the patio will cut back on the trips you need to make into the house for refills
When you shop through retailer links on our site, we may earn affiliate commissions. 100% of the fees we collect are used to support our nonprofit mission. Learn more.
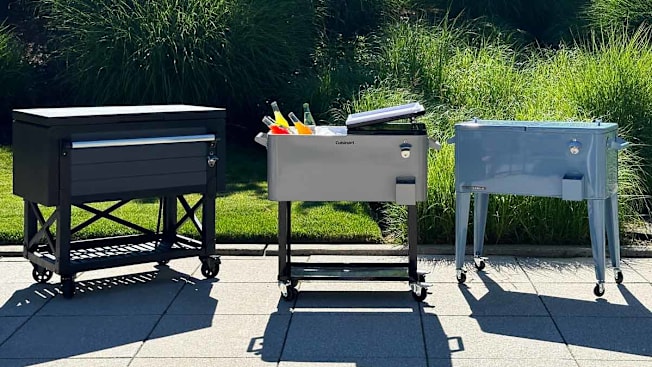
I love barbecues. My ideal summer weekend includes sitting out in someone’s yard and bingeing on grilled veggies, hot dogs, and burgers. What’s not ideal is having to make trip after trip into the kitchen to grab drinks every time someone needs a refill. You could keep a small, portable cooler out in the yard, but if you host outdoor parties often, a standing patio cooler might be a better option.
- Patio Coolers We Tested: Cuisinart Permasteel Keter
- How We Evaluated Patio Coolers
Performance: After 26 hours in a 69° F to 73° F room, there was still solid ice inside this cooler. Even with 75 percent of the ice gone, the temperature of two cans of seltzer was still holding steady at around 32° F and 35° F. Only a bit of condensation was visible around the drain plug of this cooler, a good sign that it was insulating well, according to José Amézquita, who led the temperature testing of the coolers. The shelving on the bottom of this cooler remained dry throughout the entire evaluation, too.
During assembly, I poked, scratched, and banged the wrench and Allen key provided to assemble the cooler but didn’t notice any scratching of the gray or black material.
Post-temperature testing, the patio cooler drained quickly, though there was about a quarter-inch of water left at the bottom, which required tipping the cooler on its side to empty it. After leaving it to sit with the lid on for several days, there were no noticeable smells inside.
Ease of use: Of the three patio coolers we evaluated, the Cuisinart Cooler Cart took the least amount of time to assemble, just 21 minutes, even though it had more parts than the Permasteel model. The instructions were easy to follow and the two tools needed for assembly were included inside the packaging.
Thanks to its handles, it was easy to partly lift the cooler off the ground once assembled. But because of the weight of the box, I had a hard time lifting the unassembled cart in its packaging.
The wheels on this cooler rolled easily over tiled and smooth floors with and without ice and cans of seltzer inside. The wheel locks didn’t take too much pressure to engage and once in the locked position, the patio cooler stayed firmly in place when pushed.
See our review of the best solar outdoor lights.
Performance: As with the Cuisinart model, the Permasteel cooler still had some solid ice after 26 hours. The temperature of the cans of seltzer inside held steady at nearly identical temperatures as the Cuisinart model. There was condensation around the drain plug, but no noticeable water dripped off any other parts. Like the Cuisinart patio cooler, there was a quarter-inch of water inside the cooler post-draining, so it too had to be tipped over to get all the water out.
That’s where the similarities between the two models end. Halfway through the cooler’s assembly, I had already scratched the surface with the tools I was using, ruining the model’s beautiful blue exterior. And unlike the Cuisinart model, this patio cooler had no shelving or other storage space.
Ease of use: I was mortified by the noise I made wheeling this cooler down the hall to the lab space we tested it in. It rattled the whole way, and no matter how hard I pushed or at what angle, it veered to the right. Post-evaluation, we wheeled it out of the lab filled with cans of seltzer, hoping the additional weight would help steady it. Still, the rattling and crooked wheels made it impossible to wheel the cooler down the hall without incident.
Locking the wheels so that the cooler couldn’t roll away or be easily pushed in our testing area was also difficult. I couldn’t get the mechanism to work with my foot and instead had to apply significant pressure with my hands.
Assembling the cooler took just a little longer than the Cuisinart cooler cart, about 24 minutes. The instructions stated that the wheels needed to be attached to the legs of the cooler, but the wheels actually arrived already attached. Included with the cooler was an Allen key to be used with a Phillips screwdriver (not included) for assembly. There was no mention of the hex key wrench that I ended up needing throughout much of the assembly process.
Performance: This was the most expensive model we evaluated—costing twice as much as the other two models at the time of purchase—but its temperature assessment results landed at the bottom. Just 16 hours after ice and seltzer were placed in this cooler, the temperature inside two cans of seltzer had risen to 40° F. By the 26-hour mark, the temperature was up to 52° F, and all of the ice inside the cooler had melted.
There was a significant amount of condensation on the bottom of the cooler, which dripped onto the shelving below it. Had we stored any paper utensils there, they would have been ruined.
After draining, we turned the patio cooler upside down and saw about a half-inch of insulation visible through the slats at the bottom. We reached out to the manufacturer to find out if this was the only insulation the cooler was equipped with. A representative said that the cooler had an additional inch of plastic foam insulation in all side panels and that “ice and water will last for 15 to 17 hours in 71.6° F surroundings (depending on ice level and water level).” The temperature in the lab where we tested the patio coolers ranged from 69° F to 73° F over the 26-hour assessment.
Because the drainage is on the bottom instead of on its side—the location in the other two patio coolers we evaluated—it drained quickly and completely without our having to turn it on its side. The shelving on the sides, in the lid, and under the cooler provided lots of helpful work surfaces for drink preparation—if only the drinks were kept cool inside the cooler.
All of the coolers had bottle openers on the side, but this Keter model didn’t have the cap catcher the other two had.
Ease of use: This cooler has the largest capacity, and it also took the longest time to assemble (just over half an hour). The longer assembly time was not a surprise though, because the packaging very clearly stated “45 min. assembly required.” The amount of screws we had to tighten caused sore spots on my hands but no blisters.
Once assembled, this patio cooler rolled beautifully along smooth and tiled floors. Locking the wheels was easy, but the handle on the front of the cooler was inconveniently located for pushing it around our lab halls. It was the only cooler that didn’t have side handles.
How We Evaluated Patio Coolers
We evaluated patio coolers based on their cooling performance and their ease of use.
In our lab, we recorded the time it took one person with little experience assembling large furniture to put together each patio cooler according to the user manual. We then filled each cooler with 20 pounds of ice and 25 12-ounce cans of our favorite sparkling water. We monitored the temperature of the exterior of the patio coolers and the temperature of the sparkling water inside the cans for 26 hours.
We also noted if there were any odors inside the coolers before and after draining, how well they drained, how easily they could be moved over smooth and bumpy floors, and how many 12-ounce cans of seltzer fit inside each one.